
Dirac Live DSP with Lowther Fidelio loudspeaker in my living room
(Randolf Werner, 01/2023)
Today digital room correction is widely available in home entertainment equipment. Almost any AV Receiver offers some calibration method. Manufactures have developed many different systems. One of the most famous and advanced once is Dirac Live. However digital room correction is not limited to surround sound, if done properly also 2 channel Stereo can benefit a lot from it, especially in critical room and loudspeaker combinations.
In “Lowther Fidelio in my living room” I have described my efforts to optimize a Lowther Fidelio in my living room. So far the best the result could be achieved by applying a parallel notch filter to address midrange problems, using a Helmholtz resonator to address an outstanding 45 Hz room mode and using Yamaha YPAO to fix remaining issue in the bass section. My YPAO experience was rather disappointing, it could not detect the outstanding 45 Hz room mode and does nothing in the midrange nor treble section. So I considered YPAO more as icing on the cake than a real game changer. Anyway, I recently started looking into Dirac Live and it turned out to be a very big improvement. To me Dirac Live and Lowther Fidelio complement each other perfectly.
Even loudspeakers manufactures have started to bundle their products with Dirac Live. Quadral offers active loudspeaker AURUM ALPHA and AURUM GAMMA with integrated Dirac Live. ART OF SOUND bundles many of their horn loudspeaker with Dirac Live running on miniDSP DDRC-24. Bohne Audio combines their 2-way active speakers utilizing huge ribbon tweeters with a miniDSP SHD acting as crossover and Dirac Live processor. Dynaudio’s new active streaming loudspeakers Focus 10, 30, 50 are Dirac Live enabled (limited or full bandwidth license must be purchased separately from Dirac Live).
Equipment
The equipment I used consists of the following components:
- Yamaha R-N803D Receiver. It's a solid build Stereo Receiver that combines traditional amplifier technique with the digital world, offering digital inputs, streaming, digital sound processing and YPAO room correction. In contrast to a typical AV Receiver it is not a 7.1 channels surround home theater system, instead it is fully focused on excellent 2 channel Stereo. Here it is used as pre amplifier to feed the miniDSP DDRC-24 input via REC OUT.
- miniDSP DDRC-24 to perform the Dirac Live room correction.
- Yamaha AX-590 amplifier. It’s a solid build Stereo amplifier from 1996. It is used as power amplifier to amplify the miniDSP DDRC-24 output signal. The power amplifier section is very similar (partially even identical) to the one used by the Yamaha R-N803D.
- Yamaha WXC-50 streaming pre amplifier.
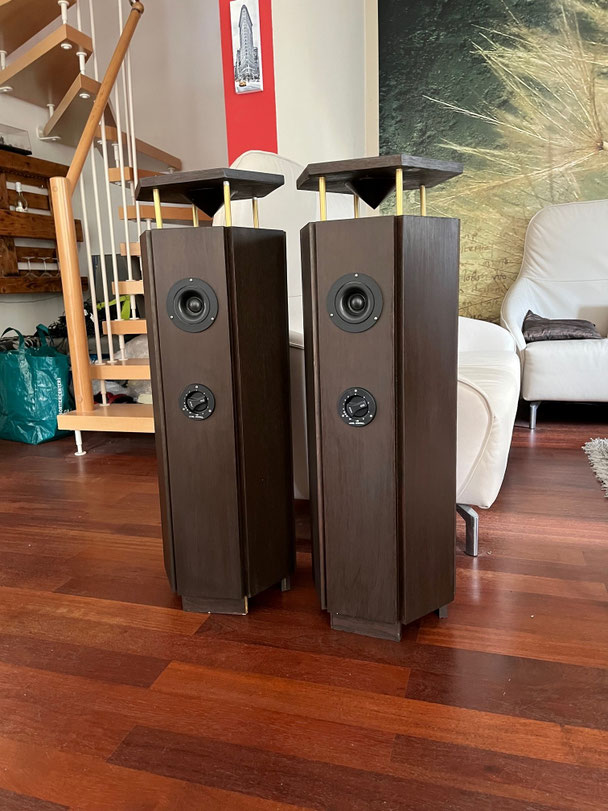
- Lowther Fidelio MKII with modified EX3 drive unit (rear chamber removed => identical to DX3)
- miniDSP UMIK-1measurement microphone used to perform measurements with Dirac Live room correction and REW measurement software.
Dirac Live enabled devices
There is growing number of options to run Dirac Live room correction in a very wide price range. Here is a small list of the more affordable options you may want to consider (with no claim to completeness):
- Dirac Live Processor for Windows and macOS software (PC with sound card and UMIK-1 microphone required) 14 day free trial license 0$
- miniDSP Dirac Live Upgrade for 2x4HD (miniDSP 2x4HD required, PC and UMIK-1 microphone required for calibration) 235 Euro
- Dirac Live Processor for Windows and macOS software (PC with sound card and UMIK-1 microphone required) permanent license 349$
- miniDSP DDRC-24 (PC and UMIK-1 microphone required for calibration) 470 Euro
- miniDSP DDRC-22D (UMIK-1 microphone included, PC required for calibration) 1000 Euro
- miniDSP Flex + Dirac Live License (PC and UMIK-1 microphone required for calibration) 799 Euro + 235 Euro
- Bluesound NODE (N132) + Dirac Live Room Correction Full Bandwidth (Stereo streaming pre-amplifier, power amplifier required, PC required and UMIK-1 microphone required) 550 Euro + 249$
- Pioneer VSX-LX305, Onkyo TX-NR7100 (9.2 Class-A/B AV Receiver, PC and UMIK-1 microphone recommended for calibration) 800 Euro
- miniDSP SHD Studio (Stereo streaming client, UMIK-1 microphone included, PC required for calibration) 1100 Euro
- Onkyo TX-RZ30 (9.2 Class-A/B AV Receiver with pre out, PC and UMIK-1 microphone recommended for calibration) 1400 Euro
- Pioneer VSX-LX505, Onkyo TX-RZ50 (9.2 Class-A/B AV Receiver with pre out, PC and UMIK-1 microphone recommended for calibration) 1000-1600 Euro
- Bluesound NODE ICON (N530) + Dirac Live Room Correction Full Bandwidth (Stereo streaming pre-amplifier, power amplifier required, PC required and UMIK-1 microphone required) 1049 Euro + 249$
- NAD T 758 V3i (7.1 Class-D AV Receiver with pre out) + Dirac Live Room Correction Full Bandwidth (PC required and UMIK-1 microphone recommended for calibration) 1300 Euro + 99$
- miniDSP SHD Power (Stereo streaming Class-D amplifier, UMIK-1 microphone included, PC required for calibration) 1700 Euro
- Sound United offers the Denon AVC-X3800H (800 Euro) Denon AVC-X4800H (1350 Euro), Marantz Cinema 50 (1300 Euro) and Marantz Cinema 40 (1800 Euro). All are 9.4 Class A/B AV Receivers with pre out and can be upgraded with Dirac Live for 349$. PC and UMIK-1 microphone required for calibration.
- JBL MA7100HP (7.2 Class-D AV Receiver) + Dirac Live Room Correction Full Bandwidth 1400 Euro + 349$
- JBL MA9100HP 1900 (9.2 Class-D AV Receiver) + Dirac Live Room Correction Full Bandwidth 1900 Euro + 349$
- NAD C 658 + Dirac Live Room Correction Full Bandwidth (Stereo streaming pre-amplifier, power amplifier required, PC required and UMIK-1 microphone recommended for calibration) 1500 Euro + 99$
- NAD C 3050 + MDC BluOS-D Modul + Dirac Live Room Correction Full Bandwidth (Stereo streaming Class-D amplifier in retro style, PC required and UMIK-1 microphone recommended for calibration) 1100 Euro + 390 Euro + 99$
- Arcam SA30 (Stereo streaming Class-G amplifier, PC required for calibration) 1500 - 2800 Euro
- Arcam AVR 5 (7.1 Class A/B AV Receiver with pre-out) + Dirac Live Room Correction Full Bandwidth (PC required and UMIK-1 microphone recommended for calibration) 1850 Euro + 349$
- JBL SA 750 (Stereo streaming Class-G amplifier in retro style, technically almost identical to Arcam SA30, PC required for calibration) 2300-3200 Euro
- NAD C 379 + MDC BluOS-D Modul + Dirac Live Room Correction Full Bandwidth (Stereo streaming Class-D amplifier, PC required and UMIK-1 microphone recommended for calibration) 900 Euro + 390 Euro + 99$
- NAD C 389 + MDC BluOS-D Modul + Dirac Live Room Correction Full Bandwidth (Stereo streaming Class-D amplifier, PC required and UMIK-1 microphone recommended for calibration) 1250 Euro + 390 Euro + 99$
- NAD C 399 + MDC BluOS-D Modul + Dirac Live Room Correction Full Bandwidth (Stereo streaming Class-D amplifier, PC required and UMIK-1 microphone recommended for calibration) 1700 Euro + 390 Euro + 99$
- NAD M10 V2 + Dirac Live Room Correction Full Bandwidth (Stereo streaming Class-D amplifier, PC required and UMIK-1 microphone recommended for calibration) 2000 Euro + 99$
- NAD M10 V3 + Dirac Live Room Correction Full Bandwidth (Stereo streaming Class-D amplifier, PC required and UMIK-1 microphone recommended for calibration) 2000 Euro + 99$
- Arcam SA35 (Stereo streaming Class-G amplifier, PC required for calibration) 3500 Euro
- Arcam SA45 (Stereo streaming Class-G amplifier, PC required for calibration) 5000 Euro
The Dirac Live Calibration software is the same in all of these cases, however it is not so easy to choose the most suitable Dirac live processor option. In my case a Yamaha R-N803D with Dirac Live instead of YPAO would be the ideal solution, affordable, solid build, good quality and supporting a full feature set. Anyway, there is no such device yet available on the market. Currently most Dirac Live implementation are available in AV Receiver products. Only a few 2 channel Stereo amplifier offer Dirac Live. Alternatively, you can consider adding Dirac Live to your existing equipment via Dirac Live Processor software running an PC or one of the miniDSP products.
To evaluate if Dirac Live is of any benefit in my environment at all I used the Dirac Live Processor for Windows with a 14 day free trial license. This is the most cost-effective starting point, PC and UMIK-1 were already present, so I was able to run a 14 day trial without any extra costs. I strongly recommend starting that way. The results were so impressing that I started looking for a permanent solution. The Dirac Live Processor for Windows is great if all your sources come from the PC, but for an every day usage it doesn’t meet my usability expectations.
The Arcam SA30 and JBL SA 750 are probably the closest match to a “Yamaha R-N803D with Dirac Live”. Anyway, I decided against it. The build quality doesn’t match my expectation for a device in that price range. There seemed to be a lot of software issues in the past. Arcam Music App looks very basic to me. Some minor features (second speaker pair connectors, tone controls, Bluetooth) are also missing.
The Pioneer VSX-LX505 is a bargain, you get a whole lot of features for your money. It has recently become available in the EU. There are a lot of positive reviews out there (but also poorly measured on www.audiosciencereview.com). At the end it comes with some compromises typical for most AV Receivers, especially in the power amp section. Fortunately, Lowther’s are very easy to drive, (very high efficiency, 8 Ohm and uncritical impedance curve). The NAD T 758 V3i is probably not much different (but also poorly measured on www.audiosciencereview.com). The Denon AVC-X3800H, AVC-X4800H and Marantz Cinema 50, 40 might be an alternative (audioscience reviews: Denon AVC-X3800H, Marantz Cinema 50, Denon AVC-X4800H). Arcam AVR 5 and 10 are other options when looking for Class A/B amplification (audioscience review: Arcam AVR 10).
Any of these devices will resample the input to some fixed frequency to perform the DSP processing regardless of the input sampling rate, many of it probably to 48 kHz, a few perhaps to 96 kHz. This is common practice in any DSP solution and should be good enough for the audible frequency range. Anyway in measurements you can see the effect, e.g. in a sharply dropping frequency response at 20 or 40 kHz when DSP processing is enabled.
In general I would recommend to checkout technical reviews on Audio Science Review and Soundstage! for finding an appropriate device. Both provide very detailed measurements. Especially look out for results related to the digital / DSP mode of the devices, since this is what you actually will use when running Dirac Live. Unfortunately often the sampling rate and DSP filter capabilities of a device are not obvious when operating in Dirac Live mode. Since Dirac Live will operate in the +/- 10 db range some extra dynamic headroom is welcome to safely avoid distortion of the signal or details getting lost in the noise floor.
Since I am still very happy with the Yamaha R-N803D I decided to go for the miniDSP DDRC-24 for now.
In 2025 I tried out the NAD C 389 with MDC BlusOS-D Modul. It's DiracLive implementation and streaming capabilities are fine. However it's residual noise floor is too high for high sensitivity speakers, it's headphone amplifier is practically unusable with low impedance headphones and even it's preout generated some gound loop hum when connected to my Yamaha R-N803D. Unfortunately most other affordable NAD products seem to suffer from the same issues. So reselled it after a few month and came back to Yamaha + miniDSP setup.
The measurement microphone should be Dirac Live certified and of reasonable quality. Each miniDSP microphone comes with an individual calibration file at 0 and 90 degree. Less expensive microphones like the ones typically bundled with AV receivers may be less accurate. The following graph shows the individual calibration files of my miniDSP UMIK-1 at 0 and 90 degree and a generic calibration file for a NAD microphone:
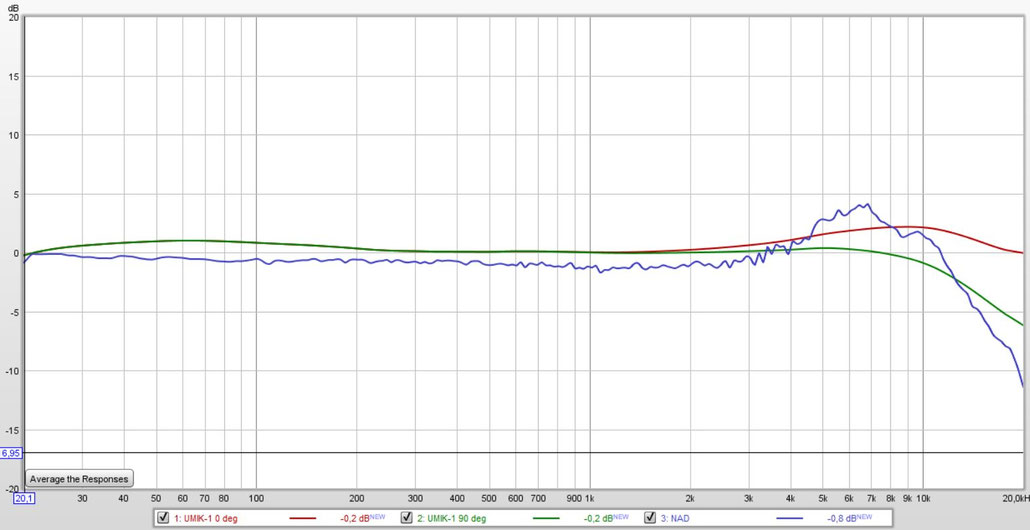
In case of question, I would recommend to use the UMIK-1 or UMIK-2. Pioneer and Onkyo support using the microphone which comes with the product for Dirac Live. Denon and Marantz require to use a UMIK-1 for Dirac Live calibration.
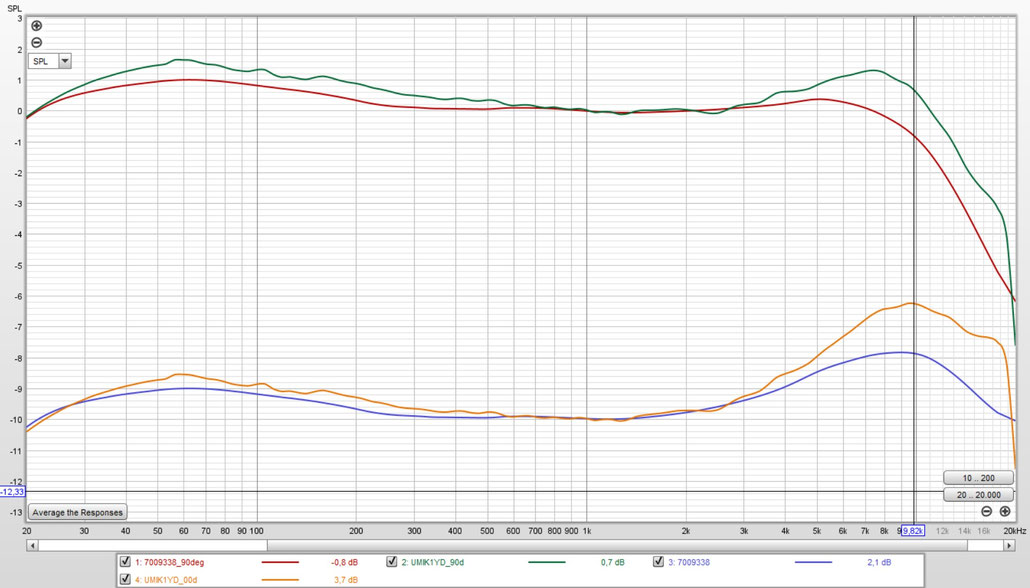
In Germany HiFi-Selbstbau offers an affordable microphone calibration service. The following graph compares the original miniDSP calibration files of my UMIK-1 at 0 and 90 (blue, red) degree with calibration files for my UMIK-1 generated by Hifi-Selbstbau:
“VON WEGEN GENAU | Muss ich meine Messmikrofon kalibrieren lassen?” from Frank Rohde is a nice video with more background information on microphone calibration.
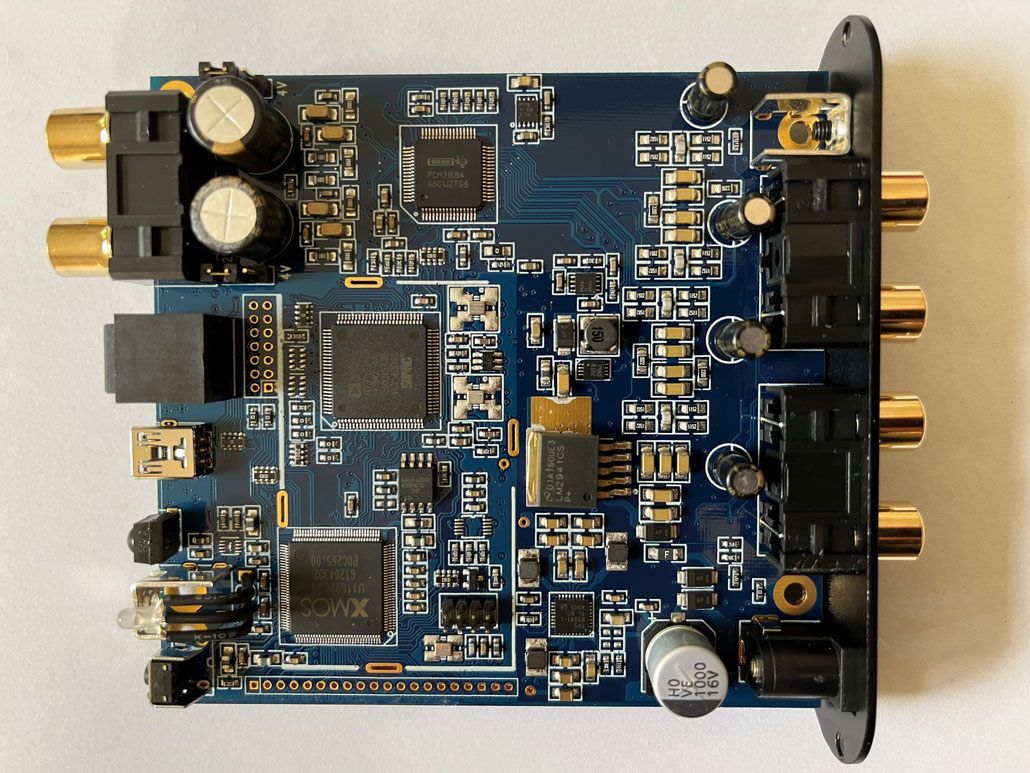
miniDSP DDRC-24
There are lots of reviews and extensive documentation available on the miniDSP DDRC-24 and the miniDSP 2x4HD (identical hardware but without Dirac Live license). Currently it is the most cost-effective way to integrate Dirac Live as standalone hardware into your system. Early revisions used a AKM AK4626AVQ A/D and D/A converter (2xADC 96 kHz, 24Bit, 102db + 6xDAC 192 kHz, 24Bit, 106db), my version (V2 R1.01 from Apr 12, 2021) uses a Burr-Brown / Texas Instruments PCM3168A (6xADC 96 kHz, 24 Bit, 107db + 8xDAC 192 kHz, 24 Bit, 112db). The differential voltage output of the DAC directly drives the unbalanced RCA output via a low noise NJM2060 operational amplifier. Both revisions utilize an AD ADSP-21489 DSP. Internal processing is 32 bit with sampling rate of 96 kHz, but only 48 kHz in Dirac Live mode. Inputs are digital USB and toslink as well as analog unbalanced RCA (2 or 4 Vrms). Digital inputs accept up to 192 kHz sampling rate. Outputs are 4 RCA channels (typically L+R and eventually subwoofer). It can be configured in many other ways as well, e.g. as a freely programmable DSP by switching to miniDSP 2x4HD mode. 4 filter presets can be stored on the device. Via an optional infrared remote you can switch between the 4 presets, enable/disable Dirac Live, control the output volume (0.5db steps), mute the volume and switch between the 3 input sources. The miniDSP can also learn control codes from other infrared remotes in case you want to control it from another remote. It is configured via the miniDSP plugin or the new miniDSP device console running on a PC connected via USB to the DDRC-24. The standard Dirac Live software is started from within the miniDSP plugin or the new miniDSP device console to perform the Dirac Live measurement and filter design. It comes with a simple 12 VDC external power supply.
The DDRC-24 can be integrated into the existing environment in different ways, e.g.
- Between source devices and the unbalanced RCA input of an integrated amplifier. This way you can e.g. connect 1 analog source, 1 digital source and your PC directly to the DDRC-24. You need to switch between sources via the miniDSP remote control. The DDRC-24 can run with fixed (maximum) master volume and volume level is adjusted via the amplifier. Alternatively, you use the volume control on the DDRC-24 and set the amplifier volume to some fixed high level. Both can have advantages and disadvantages.
- Between source devices and the unbalanced RCA input of a power amplifier. Volume level is controlled by the DDRC-24. Please note the DDRC-24 out level is limited to 2 Vrms, which may not be sufficient to fully drive some power amplifiers.
- If your amplifier has a tape monitor functionality you can use that to loop in the DDRC-24 via it’s unbalanced analog RCA inputs and outputs. This way your amplifier operates as usual, except that you have to activate the tape monitor functionality. You can use all inputs provided by your amplifier and additionally the DDRC-24 digital inputs. Many classical Yamaha amplifiers have a REC-OUT selector, in this case you would need to select the input source via the REC-OUT selector instead of the usual input selector.
- Between pre-out of your pre amplifier and main-in of your power amplifier. Pre amplifier needs to be adjusted to match the 2 or 4 Vrms of the DDRC-24 RCA input. Volume level is controlled by the DDRC-24. Please note the DDRC-24 output level is limited to 2 Vrms, which may not be sufficient to fully drive some power amplifiers.
In case you consider to modify your integrated amplifier for integrating the DDRC-24 I can recommend two sources:
- On hifiengine you can find service manuals for many amplifiers. This can be useful to add a pre-out / main-in or to intercept the fixed level signal within the pre-amp section or perhaps even to intercept the digital path in the pre-amp section.
- On nubert-forum.de you can find instructions how to add pre-out / main-in to a wide range of integrated amplifiers.
Option 1) works with any setup but since I mostly use the streaming capabilities of the Yamaha R-N803D it was not very appealing for me. Option 3) doesn’t work with the R-N803D and probably many other amplifiers with (partially) digital pre-amp. The R-N803D has 2 line REC-OUT and input terminals, but you cannot use it as a tape loop. They will only output the signal source that is also actually passed to the power amp. I studied the service manuals in detail and I think it is possible to
- Add pre-out / main-in
- Intercept the fixed level signal in the pre-amp section (in none pure direct mode)
- Perhaps even intercept the digital signal in the pre-amp section (in none pure direct mode)
However, tweaking the R-N803D turned out to be more complicated as expected, especially due to
- The ROHM BD34703KS2 used for micro step volume control and input source routing
- Smart power up checks which cause the receiver to not power up if problems like e.g. a disconnected power amp section are detected
Therefore, I decided to take a different approach for now:
Since I have an idle AX-590 I use the REC-OUT terminal of the R-N803D to pass the signal to the DDRC-24. The DDRC-24 output is passed to the AX-590 CD input terminal. This way I can use R-N803D as pre-amp and the AX-590 as power amp. This works very convenient since the AX-590 also has infrared remote control, which reacts on the same codes as the R-N803D. Therefore, I can use the R-N803D remote control to also control the AX-590 volume. The DDRC-24 runs with fixed master volume level. Since the DDRC-24 can learn remote codes I could even trigger the Mute functionality via the R-N803D remote control. Last but not least the AX-590 has switched AC output terminals which can be used to drive the DDRC-24 power supply. The power on delay of the speaker protection relays is long enough to allow the DDRC-24 to startup first and avoiding any noise when doing so. So, the end user experience is almost exactly the same as with the R-N803D alone, you just have to switch on/off two devices instead of one.
The power amplifier sections of the AX-590 and R-N803D are very similar, partially even identical with identical power rating (2x100W, 8 Ohm, 20Hz-20000Hz, 0,019% THD) although they are 22 years apart from each other:
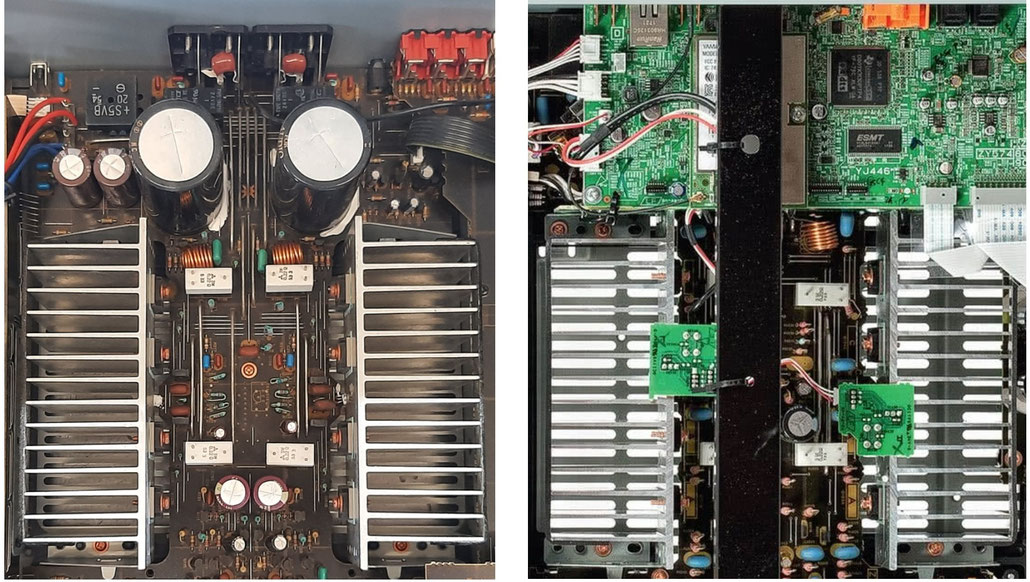
I could not detect any audible difference between the 2 amplifiers in a direct A/B comparision.
Later on, I switched to a different approach. I added a Yamaha WXC-50 streaming pre-amplifier (running in player / fixed volume mode). The WXC-50 has almost the same streaming capabilities as the R-N803D but only offers one RCA analog and one Toslink digitial external input, which is sufficient for my use case. This enables me to route all my digital and streaming sources via the WXC-50 to the DDRC-24 Toslink digital input and it’s analog RCA output to the R-N803D (running in Purce Direct mode). This way I can avoid the unnecessary extra D/A and A/D conversion and get rid of the second AX-590 amplifier. The DDRC-24 is powered on/off automatically by the R-N803D via a master/slave power strip and the WXC-50 is switched on/off by the R-N803D via its 12V trigger input. By default, WXC-50 and R-N803D use the same remote control IDs, however one configure both devices to use an alternative remote control ID set.
In general, I like the DDRC-24 a lot, however there are a few things I don’t like:
- No power on/off switch and a significant “plop” noise during power up, you need to ensure it is powered up first to protect your speakers.
- Unusual layout with all inputs located at the front together with the infrared sensor for the remote control.
- It uses the DAC internal attenuation (0…-100 dB) to control the master volume instead of a dedicated micro step volume control after the DAC like the ROHM BD34703KS2 used in the R-N803D. This is probably the root cause of audible idle or low volume “hiss” when the DDRC-24 directly drives a high gain power amp and using its master volume control to control the volume. The too high residual noise floor especially becomes a problem in combination with high sensitivity speakers (like Lowther). In such a setup one can try to optimize it by adding some attenuation (-10…-20dB) between DDRC-24 and power amp input, but the result may not always meet your expectations. In my setup the DDRC-24 could also drive the AX-590 power amp directly instead of using its CD line input, but this would result in clearly audible idle hiss with the Lowther which can be avoided by using the AX-590 volume control instead. The DDRC-24 works best when running at high master volume level (0…-10dB).
- No digital output, you can try to add I2S to SPDIF converter board.
Dirac Live results with miniDSP DDRC-24
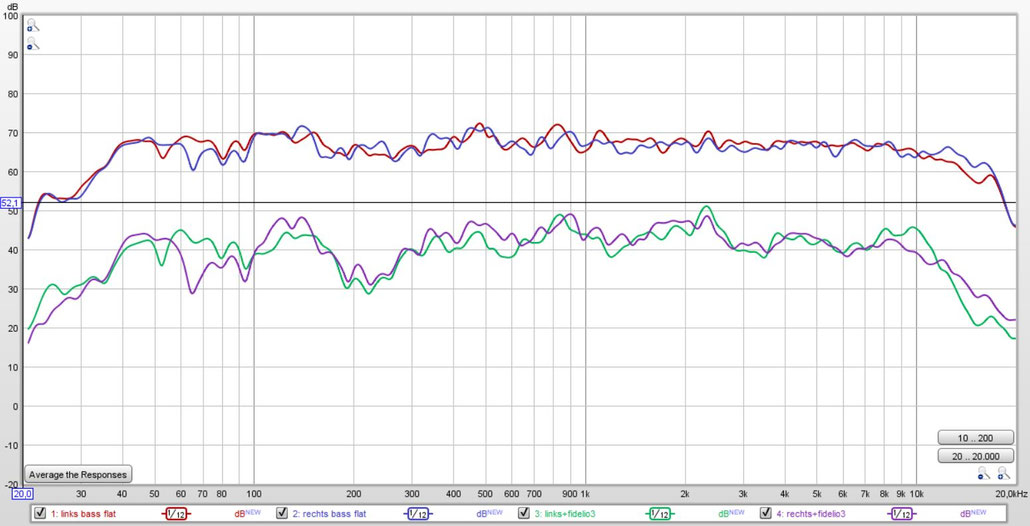
Dirac Live always uses multi point measurement, which combines the measurement results from 9, 13 or even 17 microphone positions. For all measurements I used the 13 positions setup. You need to decide whether to point the measurement microphone directly towards the speaker base and use the 0 degree microphone calibration file or to point the microphone to the ceiling and use the 90 degree microphone calibration file. For surround system measurements usually the microphone in pointed to the ceiling to capture the sound equally from the speakers in all directions. For two channel Stereo systems it can be beneficial to point the microphone towards the base of the 2 stereo speakers, therefore I used this setting for my measurements. After creating a Dirac Live filter, I verified the result using REW. For the first 3 measurements I used
- My original setup with parallel notch filter and Helmholz resonator
- parallel notch filter but no Helmholz resonator
- no parallel notch filter but Helmholz resonator installed
The upper 3 curve show the result without Dirac Live and the lower 3 curve the corresponding result with Dirac Live (all 1/12 octave smoothing):
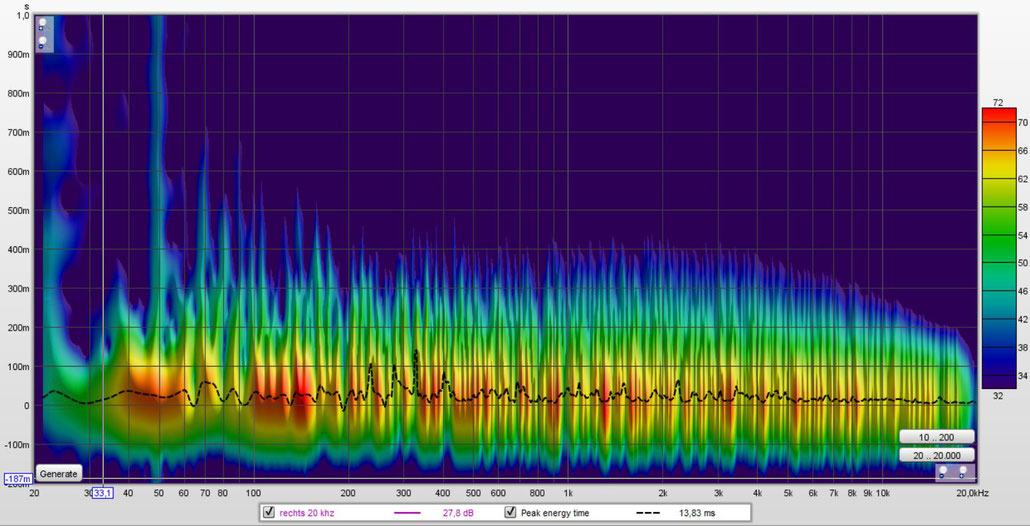
We can see that Dirac Live results is very flat (following the target curve with an intended slight decay) and almost identical for all 3 setups. So, from a frequency response perspective neither the parallel notch filter nor the Helmholtz resonator are necessary anymore. However, if we compare the waterfall diagram of the Dirac Live result with and without Helmholtz resonator
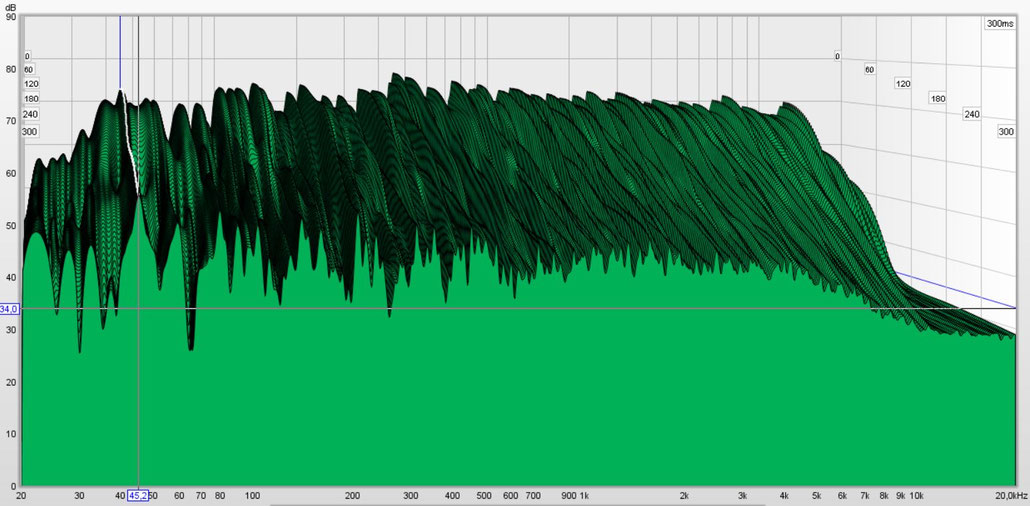
we can see that Dirac Live cannot fix the poor reverberation time at 45 Hz in contrast to the Helmholtz resonator. Therefore, I removed the parallel notch filter from my setup but kept the Helmholtz resonator.
In 2020 Dirac Live Bass Control introduced multiple independent subwoofer support to further improve the low frequency result. Most recently in 2023 Dirac Live Active Room Treatment (ART) was released which utilizes all channels of a multi-channel setup to generate anti sound to improve poor room reverberation times below 150Hz. A short demo of the generated anti sound can be found on the CES 2023 demo. This may make my Helmholtz resonator obsolete but would require a multi-channel setup.
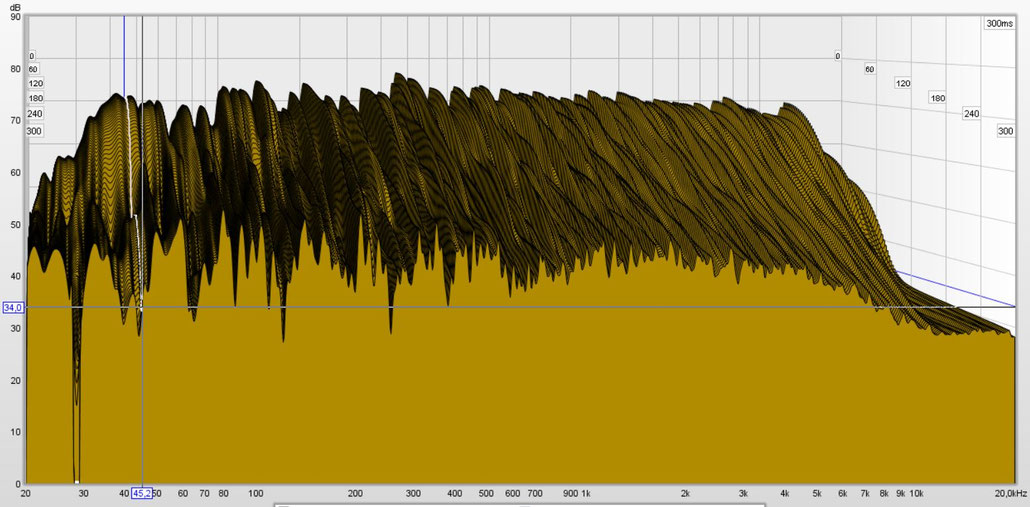
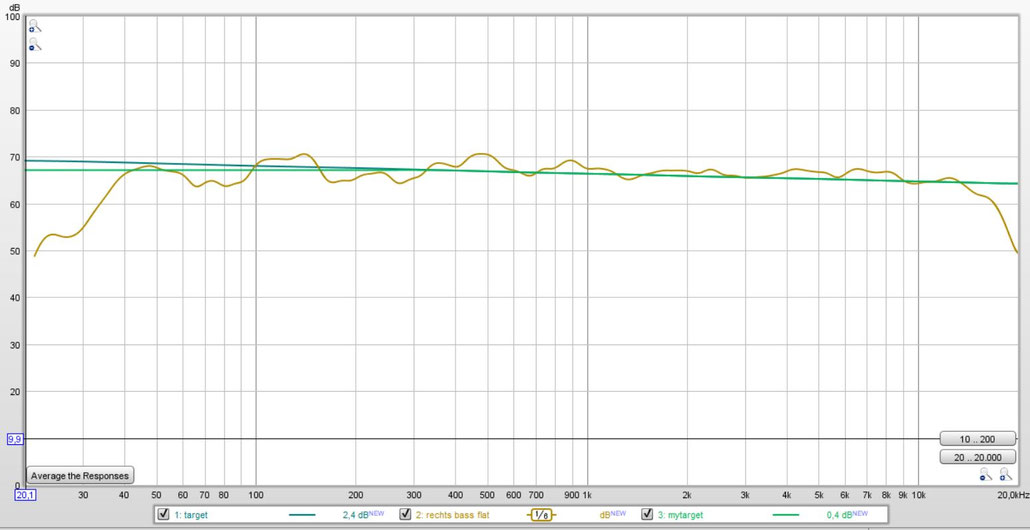
So far, I used the default Dirac Live target curve and automatically calculated correction frequency range, which sets an upper limit for the correction range at 13Khz in my case. To see if we could improve the high frequency rolloff I adjusted the upper limit to 16 and 20 Khz. The graph uses 1/6 octave smoothing and shows the default Dirac Live target curve and the REW measurement for an upper correction limit set to 13, 16 and 20 Khz:

We can see the slight linear decay of 5 dB in the default target curve from 20Hz to 20 kHz. The measured result follows very closely the target curve. The high frequency rolloff due the Lowther drive unit limitation and of axis measurement can be improved as well. I noticed no negative side effects (e.g. DSP artifacts) of doing so and therefore decided to set the upper correction limit to 20Khz. The effect of this is very subtle and not easily audible for me, since these very high frequencies (often also called “air” or “sparkle”) are more felt than really heard. The resulting spectrogram is:
The default Dirac Live target is already rather flat. Often people emphasis the bass section a little bit more. However after listing a long time to various music and various volume levels I decided to do the opposite and use a flat target curve below 400 Hz. The graph shows the default and my modified target curve and the measured final result (1/6 octave smoothing):
There is no objectively best target curve, in depends on personal preferences and listening volume. The graph shows some target curve examples (Harman, NAD, Dirac Live default, mine):

In the latest version of the Dirac Live mobile app a so called “auto target curve” feature was introduced. The idea is to not just strictly follow a given target curve but to instead auto generate a specific target curve which tries to eliminate the problems caused by the room but preserving more of the loudspeaker characteristics. Since the mobile app version cannot be used with miniDSP and the feature is not yet available in the Windows version I could not test this feature so far.
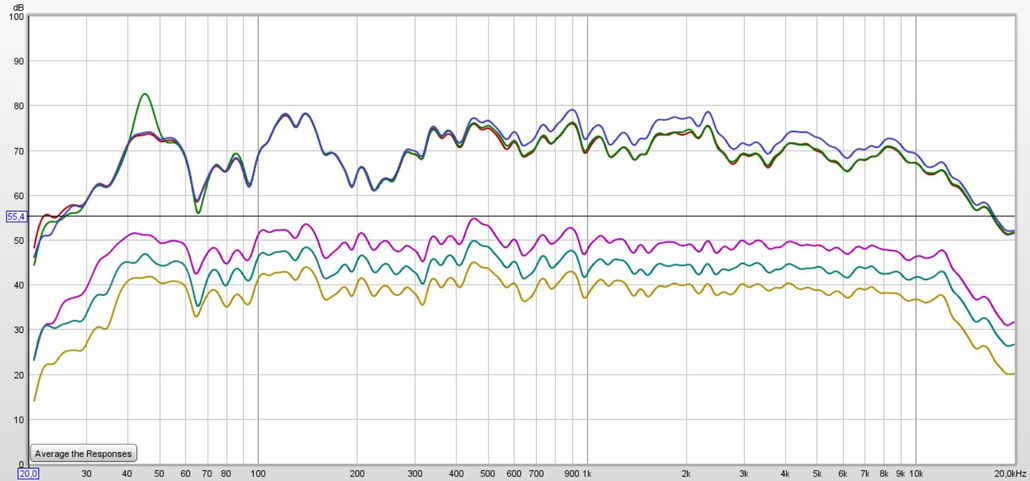
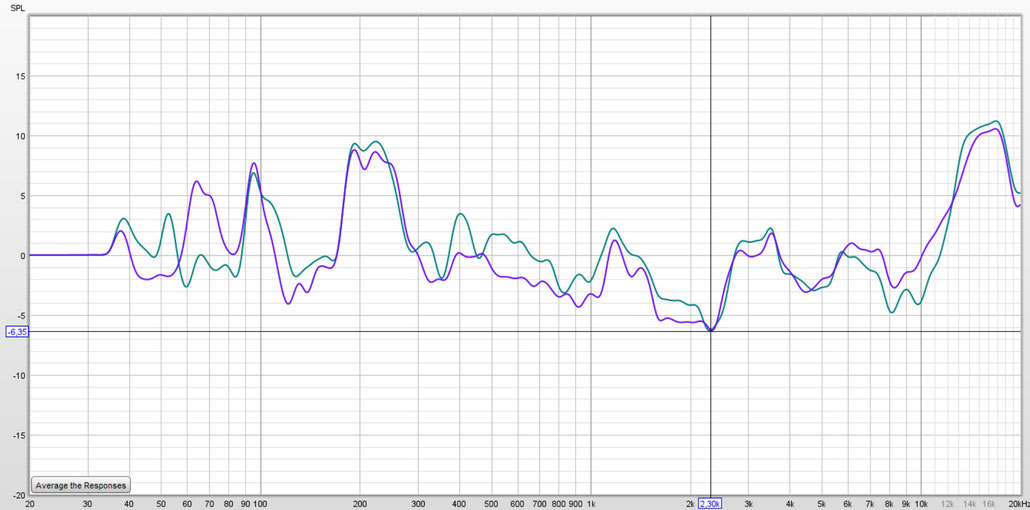
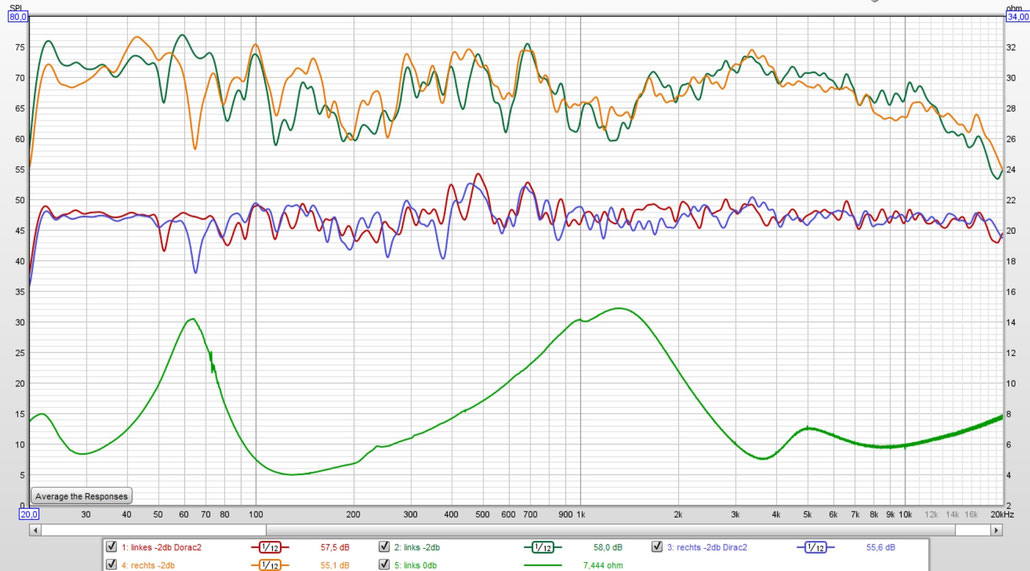
For a good stereo imaging it is crucial that the signal from left and right loudspeaker are correlated as closely as possible (in time and frequency domain). The next graph shows left and right measurement without (bottom) and with my final Dirac Live filter (top) (using 1/12 octave smoothing):
We can see that left and right channel are now more closely correlated in the frequency domain.
As one can expect from the measurements the Dirac Live effect on the sound is very obvious. Especially the midrange section is very different and significantly better than using the parallel notch filter. Stereo imaging is improved as well and finally the bass section is a little bit more controlled. So far with the combination of Lowther Fidelio, Helmholtz Resonator and Dirac Live I could achieve the by far best result in my living room.
I finally measured the frequency response correction of the DDRC-24 with Dirac Live filter enabled from USB input to line output of the DDRC-24 for left and right channel:
We can see Dirac Live equalization is limited to at most +/-10 db, which is fully used to compensate a) the high frequency rolloff and b) a drop around 200 Hz. Although these 2 corrections may look like the most important / outstanding ones they are not. By carefully listing they are audible with specific music, but the corrections in the midrange are far more important and immediately audible with almost any kind of music.
Dirac Live with vintage KEF / Dynaudio DIY loudspeaker
Last winter my father passed away. There were 2 loudspeakers in the estate I build for him about 35 years ago. Since they were still in good condition, I decided to restore them by replacing all capacitors in the crossover and finally did some measurement with and without Dirac Live. The loudspeaker uses a hexagonal pillar bass reflex cabinet with 2 KEF B110B SP1057 bass/midrange drivers and a Dynaudio D-28 dome tweeter. It is a 2,5 way design with one B110B in the foot of the pillar working up to 220Hz, one B110B at the top of the pillar with a reflector cone working up to 3500Hz and a Dynaudio D-28 tweeter. The crossover is 2nd order butterworth network design.
Also, this type of speaker could be significantly improved in my room using Dirac Live:
References
- Lowther Loudspeaker Systems Ltd, https://lowtherloudspeakers.com/
- miniDSP Dirac series, https://www.minidsp.com/products/dirac-series
- Room EQ Wizard (REW), https://www.roomeqwizard.com/
- Yamaha, https://uk.yamaha.com/index.html
- Yamaha R-N803 review, https://www.digitaltrends.com/?review=yamaha-r-n803-review
- Dirac Live
- Mathias Johansson, Dirac Research AB, On room correction and equalization of sound systems
- Interactive Frequency Chart from Independent Recording Network, https://alexiy.nl/eq_chart